Donnerstag, 31. Mai 2012

Make your own: Elderflower syrup {Holunderblütensirup}

I promised some cool posts so here we go :)

This is probably one of my favourite posts yet because it is a favourite part of my childhood. I never did it myself back than but it was something we always had and I remember the joy of drinking sparkling sweet and self made lemonade. Especially because we did not have much juice around our house so this was something special.
Elder flowers grow everywhere around here also it got harder to find some in the last couple of years.
So I guess we just start ;)


Jep. That's a lot of sugar. But after all your making syrup.
You'll also need a large, large, laaarge cooking pot and empty bottles at the end of the week.
Start with two liter of water. Bring to a boil and pour in your sugar. Bring to a boil again. Be careful: Boiling sugar water has a way higher temperature than boiling water!
While your sugar mixture will need some time to get hot enough, wash your organic lemons under hot water and slice them.
Free your elderflower umbels from the thickest parts of there stems:


 When your sugar water is boiling add your elderflower umbels and lemons.


Let boil for a short period (this is actually not requested but my mum and I do it to make sure that everything is clean and healthy). Turn off the heat, close with a lid and let it stay for one day. Pour in your Vitamin C powder stir and leave the mixture to draw for another six days.

After six days. Comes the actual "work" part ;)
First I usually filter it with a large kitchen strainer. If you want to make it absolutely clean use a towel (put it inside your strainer. It will take some time but it will be absolutely clean afterwards). Anyway I don't mind little flower leftovers.

btw: You don't have to throw away the soaked lemons. They are great in any chocolate cake or muffin!

Bring your, now lemon and flower free mixture, to a boil. While doing this wash your bottles by pouring in boiling water.  I place my lids in an extra mug with boiling water.


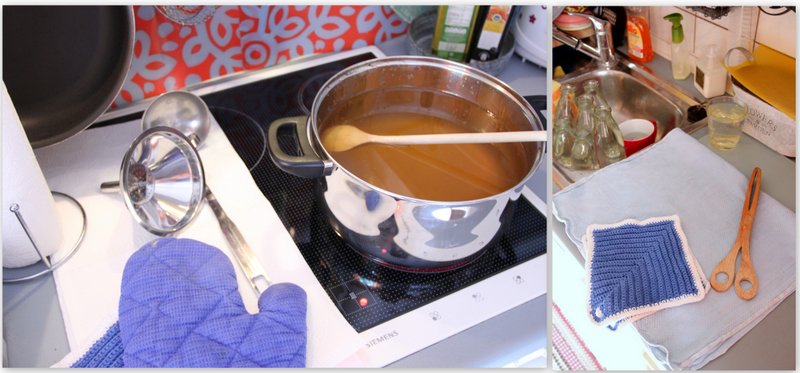
When the syrup boils, fill it in your bottles. I always make a few smaller ones to give away as a present. (Be careful again: once by pouring out your hot water and second by pouring in your syrup. This stuff is extremely hot!)

And you're done :)
Enjoy it mixed with simple water or, for all grown ups, some champagne :)


And our peonies started blooming!!!! I just love my life :)


I wish you all a wonderful day. If you have any questions don't be afraid to ask :)

Mittwoch, 30. Mai 2012

I have...

...tons of cool ideas and posts and pictures on my laptop and on my mind but for today:
The only thing I can do:


and turn the music on LOUD!

I AM DONE WITH SCHOOL! YAY! super duper double YAY!

Montag, 28. Mai 2012

Nothing more to say


Last day of preparations. I wish I could say I was giddy with excitement....nervous close to hysteric would be probably more accurate. Anyway. I'm going to do it!
Wish me luck :)

Freitag, 25. Mai 2012

Donnerstag, 24. Mai 2012

Nur noch 6 Tage {Wie ich meine Hoffnung am Leben erhalte}

                                  Was meine Laune und Hoffnung momentan am Leben lässt:

Der Blick nach draußen (und Eiscafe)
Die wunderschönen Wolken (Grüßt mir die Alliterationen...)
So viel Farbe um mich drumherum
Und die Tatsache, dass es ja nur noch 6 Tage sind...*seuftz*
                                  Lernen ist schon eine fiese Sache. Aber auch das will getan sein!
                                  Also mit neuem Mut ans Werke ;)
                                  Und wenn gar nichts mehr geht macht man eine Pause und dreht
                                  Mamma Mia! ganz laut auf! Dann hört auch niemand wenn man
                                  mitsingt ;)

Mittwoch, 23. Mai 2012

Did you ever wonder....

...how a peony might look on the inside?


...I did.

Being 19

I never really considered my age as a topic since it never occurred to me in any special way. But recently, it certainly did (probably because of all the learning. Learning makes me think a lot about things I normally don't think about in order to prevent thinking about my actual studies....).

Well. I'm 19.Left those 18 behind me but not yet 20.
And may I just say: 19 is exhausting.

It is this whole uncertainty about everything. You're done with school (well, nearly) Your life lies in front of you offering you everything.
But what to choose? What will it bring? What's the right way?
And apart from all of this (I mean, everyone tells you that your decisions are not lifetime decisions...well some people do...)
And then for all those moods: One moment you're ready to conquer the world (Job? Work? Children? Family? Give me everything! At once!) and the next moment everything is a huge mess inside your head (Family? I don't even have a boyfriend!)

Trust me: This whole hormone-Up-and-Down can be quite exhausting.


So 19 is hard.
But you're old enough to realize...
This too shall pass.

And before making it an even messier mess than it already is:
  • dye your hair (Hey! You're 19! No one cares!)
  • do something you never did before (And there are endless possibilities)
  • Try some funny things (Like meditating. Good, since it also calms your giddy self)
  • ...

Only important: Don't drown yourself in this gray and dark episode.
Get out your sketch book, your video collection, your phone book. Call someone. Make cocktails with friends. Make a cool and extraordinary photo shoot (Who cares about pimples? We have picasa!!).
It is important to remember that all this is a part of your life.
Enjoy it.
We only have one.

And we are 19 only once

Well that was an age appropriate post, wasn't it?! :) And I did dye my hair. Dip-Dyed it. Red :)

Dienstag, 22. Mai 2012

Den Alltag versüßt

Darf ich das mal so sagen?! Ich hab die tollsten Freunde der ganzen Welt!

Die, die es verstehen einen von hinten her zu überraschen. Einen zu schocken weil da ein kleines Paket in der Post steckt (nanu ich hab doch gar nichts bestellt!!!! oder ist mein Gehrin dank dem Lernen schon so verweichlicht, dass ich das nicht mehr mitkriege^^°)
Und dann macht man es auf. Und ein Lächeln stiehlt sich ins Gesicht. Und das nur wegen einer verliehenen Kamera (macht man doch gerne. Bei den heutigen Handys!)


Tausend Dank meine aller liebste Feli lu!!
:)

Ansonsten lerne, lerne, lerne ich und träume von einem Leben in dem man sich nicht mit Philosophen und den Lyrikern der Romantik beschäftigen muss (oder Faust) und überhaupt...wo man das Wetter draußen genießen kann!!!

Montag, 21. Mai 2012

DIY: Little hanging magnet garden

Wow this is a late post but still better than no post at all, isn't it? ;)

The learning-exam-nervousness totally caught me so I'm up late trying to get all those philosophers and there theories in my head (kind of squishy up there...)
Anyway. What could be better to get your head organised than a little and fun DIY project.

I actually really did this while studying, since it needed some time to dry (the project!). And I also got around to use some of the random stuff I collected or could not throw away for any other reason (thumbs up for this one).
So here we go:

Hanging magnet garden


You'll need:
  • piece of wood (mine was about 17x25 cm...something like that)
  • little flowerpots
  • hand drill
  • twine
  • glue
  • scissors
  • mini (strong) magnets
  • white and black paint
  • some cardboard
  • cutter
  • sanding paper
(that sounds much but it's actually not. I had everything on hand and was just using random things)
Start with sanding your piece of wood.

Apply your first coat of white paint, let it dry, sand again and apply another coat of white paint. First round is done.

As you can see in picture two, I had a crazy idea about a big sized stamp...
Just skip this step!

So at the end I just cut a simple triangle out of my cardboard. My super holding construction did not work out either. The paint worked as a sort of glue and I had to use my fingers to get it off again.
So: Grab your triangle, some black paint and don't be afraid to get some colour on your fingers!

(I also painted my edges black) Let it dry.


(See why this was amazing to do in between of some learning sessions?! :D)

Now stick on your little magnets. Use your hand drill to make holes (I checked the position with my tiny flowerpots first.)

 Let dry completely.

(We are nearly done!)
Seal your flowerpots (I used Pattafix). Tie them on with your twine. The way I did it, my flowerpots are easily removed so I can replant them as often as I want.
Put in some nice succulents.
And enjoy! :)


And wouldn't it be great on your fridge? Or any other magnet board in your house? I certainly do love mine :) (Also: colours, shape and size are...of course...totally optional. I had some pink in mind but, oh well...I just like it black and white...)


Samstag, 19. Mai 2012

I wish you all...

...a beautiful weekend!


I'm off to eat some awesome strawberry cake and dye my hair :)

Freitag, 18. Mai 2012

Weekly photos and bribery

"I got my monthly "I don't want to do anything" mood back. But guess what? I'm prepared.


So when it hit me in the morning I straight went here and here digging for inspirations and made this plan:


If I...
a) ...learn as much as possible this morning
b) ...follow my To-Do List (lists would be more appropriate. I now have a book just for my lists to keep track of them...)
and
c)...get my good mood and normal-sunny-self back...


I'm allowed to either watch a movie or paint some of my clothes or do something with all my little potteries or make a card or..(well you get the idea) in the afternoon.
That's something lo live after!"

This is (above) what I wrote in the morning.

What reality looked like:
I had a reason for feeling grumpy.
I lost my To-Do-book.
I spent the morning with sleeping, eating and scrolling through blogs.

I ate all the cookies...

And I feel horrible now (not really. I just needed one day of doing nothing)

But: I'm going to do all the worked I've planned to do now! (Pinky Promise to myself. Especially with a banana-chocolate-milkshake by my side! (Just mix together: One banana, milk and chocolate ice cream. Yum!!)) I'll just skip the reward-yourself-part.
Figure it out....

weekly photos...

 Und für alle die gerne gute Brote essen: Der absolute Brotebelag-Königinnen-Anweisungs-Tip ;)

Der Fitmacher:


 In der folgenden Reihenfolge schichten:
  • Obazda
  • Käse(am besten einfacher Ziegen-Scheiben-Käse)
  • Avocado
  • körniger Frischkäse
Oder:
  • Frischkäse
  • Avocado ("gemantscht")
  • Mojo Verde 
  • Salat
  • Radischen Scheiben
  • Ziegen-Scheiben-Käse
Guten Appetit! :)

Donnerstag, 17. Mai 2012

My personal {coffee} deadline

I have this personal deadline each morning.
Normally I stand up. Do the bath related stuff take my breakfast and than I make my coffee and go upstairs into my room.
As long as I have coffee in my cup I'm allowed to do what I feel like (blog, read, google...). Since I like my coffee hot it's not that long :(

See! Already empty. So I'm off to more of this:


Do you have a personal deadline as well? I'd love to hear from you :)

Mittwoch, 16. Mai 2012

Photo of the day

Sprayberry

The crane project

Because I missed colour and kindness so often I came up with the crane project.
It so often happened to me that people I smiled at or kindly greeted just looked weirdly back at me.
It makes me sad that simple things like kindness and a sense for others get lost these days.

So I wanted to invent something to bring it back. Something small I could manage but that would bring some attention as well.
So I started folding cranes. (Sort of. I already loved it so I just went with it anyway)

Cranes stand for vigilance and wisdom. In Japan it's also a symbol for longevity and luck. According to an old legend, you'll get one wish free if you fold 1000 cranes (so keep you're fingers crossed. There are only about 956 missing...) ;)
It was especially this legend that thrilled me as a kid. I always imagined myself in a room filled with hundreds and hundreds of cranes.

Anyway. So I started folding cranes. Each crane gets a little message written on its wings and then I sent them flying at public places.
It certainly adds colour but it also adds attentiveness and openness if you're willingly to be open.

The plan is to do this once in every city I pass. Maybe it will inspire people or just remind them of simple but important.

Every city will get its own post and I'll sum them up with one photo and a direct link in my "crane" section (above).

So here we go.

I started with my hometown since I was super excited and unsure. I don't know if it's the same with you, but going to a public place and hanging cranes on trees is not something I did before. (Therefore, my fingers trembled like crazy!)
However I managed it :)


Try something new

Make a compliment :)
The next day all but two of my cranes were gone. I'd like to imagine that people took them to remind themselves of something colourful and nice. Maybe they put it in their room?!

Montag, 14. Mai 2012

DIY: Display for your earrings

In our little household my mum's the chaotic one. She leaves everything were she just put it (which ends in an endless searching for keys/maps/bags...). I'm the one who loves everything clean and tidy.
(Just like our telephone. She always leaves it right next to our water boiler. One day we will have a hot boiled/bathed telephone...great!)
But this is also what I like about my mum. She has character! :)

Anyway. A new week and my learning-schedule officially started today (well the one in my head). Exactly two weeks until my exams. Two weeks. Two subjects. I'll rock it (hopefully...I'll do!)

But since I need something to brighten up my mood (and what could be better than colour and fabric and DIY!?): So here we go with fun and self-made :)

Something to put your earrings on


I had the idea one year ago and made a version that did not last long. Now, (after a request) I made a longer lasting one and since it looks good, is easy to make and does not need any special equipment I thought I share it.


You'll need:
  • pins
  • canvas
  • fabric
  • stapler
  • tongs
  • and (if you want to make it cute): a plastic bag, masking tape, a label and ribbon
You can either use one fabric or mix and match. If you use different ones I recommend sewing them together.
Lay it on your canvas and use your stapler to fix it. (I used her idea. She did it with wallpaper but fabric does just work fine as well).


For your "hooks" use your two tongs and your pins. Curve the pins like a baited hook (well they do look like this, don't they?!).


If you want it pretty, put your hooks into the plastic bag (Cut to your preferred size) seal it with masking tape and label it.

There will never ever be any rummaging through earring-drawers/boxes/..!

I wish you all a wonderful monday. I'll go back to my study books....yay...-.-


Btw: Just in case you are curious: I made this cake as a mother's-day-cake and I can only highly highly recommend it :D